Easy Installation Of Your Custom Printed Wallpaper Mural
Wallpaper Installation Guide
 Preparation - Make sure that the bare wall is sound, clean and dry. Remove all loose paint, plaster or old paper and fill all holes and cracks with filler, smoothing down the surface when it is set.
"Size" The Wall - Prior to wallpapering it's a good idea to "size" the wall as this seals porous surfaces to prevent the paste from drying too fast and it also aids slip and slide when papering.
Beeline Primer Sealer is a highly recommended wallpaper "size" product as it does all of the above and also helps reduce seam splits, raised edges and bubbling of wallpaper.
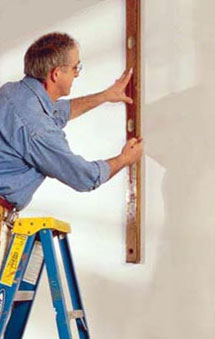
Start Line - Few walls are truly square or perfectly vertical. To overcome this, use a plumb line or spirit level and draw a vertical pencil line from ceiling to floor at a set distance from the left hand edge of your wall.
This start line measurement will be shown in the printed installation instructions that come with your custom printed wallpaper order.
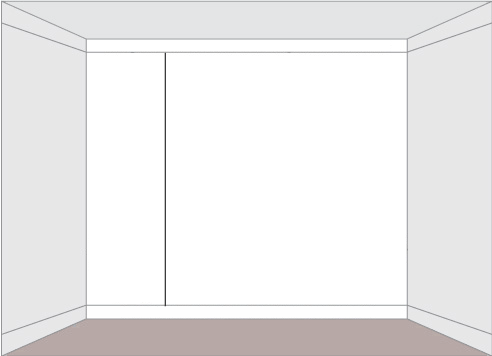
Wallpaper Panels - Your wallpaper mural is split into the minimum number of panels possible to minimise the number of joins. This means panel widths can be between 800mm to 1200mm wide, dependant on the size of the wall.
An extra bleed of 100mm is added to the far left and far right panels and to the top and bottom of each panel.
Note that each panel is labelled at the top -
Panel A, Panel B, Panel C, Panel D etc.
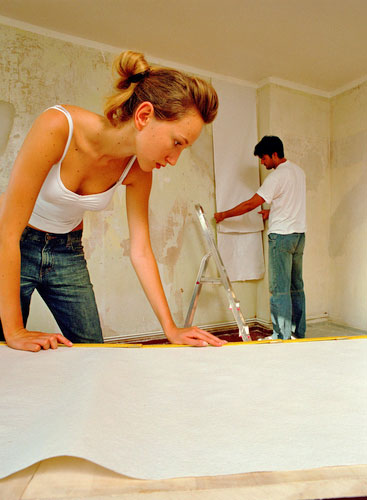
Helper - it may be helpful to have two people install your custom printed wallpaper.
- Use a plumb line or spirit level and draw a vertical pencil line from ceiling to floor
- Start With Panel B
- Line the left hand edge of Panel B to the plumb line you have drawn. Your custom wallpaper panels are designed to be overlapped by 30mm at each seam.
- Continue with Panel C making sure the pattern repeat or image is matching across the two overlap areas so the design continues seamlessly.
- Finish finally with Panel A
Wallpaper Installation & Pasting Guides
Standard Wallpaper - Digimura Ready Pasted Classic
For Digimura Ready Pasted Classic Smooth Wallpaper start by soaking the pre-pasted panel in water for 15 seconds.
Lay the wallpaper onto a clean table with paste side up and fold one end toward the middle then fold the other end into the middle and leave the wallpaper like this for 1 minute to activate the adhesive.
Put on the wall and smooth out with a damp sponge, wiping off any paste or dripping water
Premium Durable Wallpaper - Digimura 2.1 - Paste The Wall
For Digimura Wallpaper apply undiluted adhesive to the wall surface to be covered using a medium pile roller and a brush for cutting-in.
Only paste one drop area at a time. Use a soft spatula to apply the wallpaper to the prepared surface using a smooth up-and-down motion.
Take care not to squeeze the adhesive out at the edges.
Self Adhesive PVC - Sticki-Scape - Paste Free
Sticki-Scape is paste free, which means there is no need for messy and time consuming pasting.
Use masking tape to position exactly in place. Start at the top of your Sticki-Scape panel and pull down approximately 5cms to 8cms of the backer. By lightly pressing and smoothing, apply the 5cms to 8cms exposed adhesive area of your Sticki-Scape to your chosen surface area. Then continue to slowly pull the backer downward in 5cms to 8cms increments smoothing the Sticki-Scape as you go.
Once the Sticki-Scape is started, it may be helpful if another person holds the bottom and pulls down slightly giving some tension and keeping it straight and easier to apply.If there are bubbles or wrinkles after applying segments, peel the desired area back and gently re-apply with a soft, felt-sided squeegee to remove the bubbles. It is important not to press too hard with the squeegee as this could damage the image. It is recommended to squeegee at a 45 degree angle with overlapping, firm strokes. Also an air release tool may be used to pop stubborn air pockets.
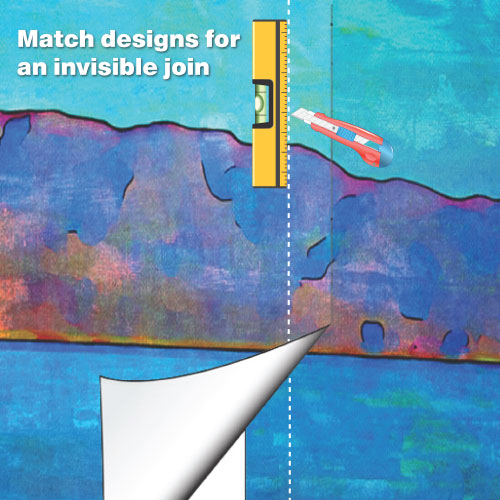
Double Cut Wallpaper for Perfect Overlap Seams
Your mural is produced with the minimum number of panels to cover your wall, the panels are designed to overlap by 30mm and your finished mural will look great just as it is with the overlap. But for a close to seamless look you may decide to double cut your panels to trim the overlap.
![]() Double Cutting - a technique used to obtain perfectly fitted seams. This is done by overlapping one panel of wallpaper over the other until the image or patterns are perfectly matched. Then a sharp blade is used to cut through both layers. The excess edges are then removed.
Double Cutting - a technique used to obtain perfectly fitted seams. This is done by overlapping one panel of wallpaper over the other until the image or patterns are perfectly matched. Then a sharp blade is used to cut through both layers. The excess edges are then removed.
To trim the overlap you will need a straight edge and a wallpaper trimming knife (Harris Wallpaper Trimming Knife). Make a clean, straight, vertical cut through both of the layers at the centre of the overlaps. You may need to frequently change blades (just snap off old blade).
Then peel away the waste on the top layer and lift the overlap and peel away the waste on the bottom layer. Smooth both layers back down, wipe away any surplus adhesive. The result will be a nearly invisible seam between the panels. The nice thing too is that the razor line itself doesn't need to be perfect. Just keep your eye on the middle of the overlap and keep going, slowly.
Continue to install panels and double cut the seams in the same manner until your entire mural is hung, finishing finally with Panel A. Take time to make sure everything is smoothed properly into place and that all edges are stuck down.
Simple and Perfectly Matched Seams
In this video, professional paperhanger John Clift demonstrates how to make tight, back-to-back cuts at wallpaper joints.
Courtesy: Fine Homebuilding
General Guide to Installing Wallpaper Media
The video above covers the installation and removal of the following wallpaper media:
- Pre-pasted wallpaper, such as Digimura RP Classic
- Pasting the wall method, such as Digimura 2.1 Premium
- Adhesive backed wallpaper, such as Sticki-Scape
- Ferros back coated media used with printed panel metallic coated media
- Magnetic media on steel ferrite painted wall
Looking For A Painting & Decorating Contractor For Your Wallpaper?
 Our custom printed wallpaper is easy to install. However, if it's your first attempt at papering try using a lining paper first. Not only will it give you the perfect surface to hang your custom wallpaper on, it will also give you some invaluable practice.
Wallpaper Installation: If you are not familiar with hanging wallpaper we recommend that you contact a professional decorating contractor who will be able to hang the wallpaper on your behalf. The Painting and Decorating Association represents thousands of painters and decorators across the UK and will help you find a recommended PDA member in your area.